In-Ceiling and In-Wall Speakers: Invisible Audio for Smart Homes
Most people only notice speakers when they’re standing there on a shelf or mounted on a wall, eating up square footage and clashing with the room’s design. In-ceiling and in-wall speakers solve that problem by disappearing entirely. The grille sits flush with the drywall, paintable to match the room, and the sound comes from seemingly nowhere. Done right, it’s a genuinely elegant solution. Done wrong, it sounds hollow, lacks bass, and requires opening walls a second time to fix.
This guide is for homeowners who are past the “should I?” phase and into the “how does this actually work?” phase. It covers the speaker types, the installation realities, what things cost, which brands matter in the custom integration space, and how in-ceiling audio connects to broader smart home systems.
Why Architectural Speakers Work (and Where They Fall Short)
The appeal of in-ceiling speakers is not just aesthetic. Hiding the speakers eliminates the cabling runs across baseboards and the floor-standing enclosures that get moved during parties. In rooms where acoustics matter, removing large reflective boxes from corners and walls can actually improve the listening environment. The drivers aim down at the listening position, which distributes sound more evenly across a larger seating area than a pair of bookshelf speakers does.
The tradeoff is bass. A speaker cabinet is a tuned acoustic enclosure. The cavity behind an in-ceiling driver is the attic or the floor joist bay, which is not tuned at all. Low frequencies need air volume to develop properly, and drywall cavities have too much of it. Most in-ceiling speakers roll off noticeably below 80 Hz, which means you need a subwoofer to fill that gap if music quality matters. For background listening, conversations, or TV audio in a secondary room, it’s not an issue. For a dedicated listening room or a media room, pair in-ceiling speakers with an in-wall subwoofer or a discreet subwoofer cabinet.
In-wall speakers generally handle this better than in-ceiling models because the baffle area is larger and the driver can use the wall cavity in a more controlled way. Companies like Sonance and Polk Audio publish enclosure dimensions for their high-end in-wall models to give installers a target cavity size during framing.
If you’re comparing the full-range performance of architectural speakers against a self-contained system for a dedicated listening room, the Sonos vs custom-installed audio breakdown works through that tradeoff in detail.
Types: In-Ceiling, In-Wall, and the Hybrids
Standard in-ceiling speakers are round or oval, typically 6.5-inch or 8-inch woofer diameter, with a tweeter pointed down. The 6.5-inch format (roughly 9 to 10 inches cutout diameter) fits between standard 16-inch on-center joists without modification. These are the workhorses of whole-house audio. Polk Audio’s Reserve R900 series, Klipsch’s CDT-5650-C II, and the Sonance VP Series all live in this category.
In-wall speakers are rectangular, usually two-way designs with a larger woofer (6.5 to 8 inches) and a separate tweeter. They mount in a vertical plane and sound more like conventional speakers because the soundstage is front-facing rather than ceiling-down. These are preferred for home theaters, media rooms, and dedicated listening spaces. The Monitor Audio Core W265-LCR and the Sonance Cinema Series are common choices among integrators.
Angled or pivoting in-ceiling speakers solve a specific problem: the listening position isn’t directly under the speaker. Kitchens with island seating, great rooms with sectionals pushed against a wall, or staircase installations often need a driver that aims toward the listener rather than straight down. Polk Audio, Klipsch, and Definitive Technology all make in-ceiling models where the tweeter or the entire driver assembly pivots up to 15 degrees.
Shallow-depth or low-profile models are engineered for spaces where joist depth is limited. Standard in-ceiling speakers need 3.5 to 5 inches of depth behind the drywall. In spaces with concrete ceilings, shallow floors, or finished soffits, that depth isn’t available. Sonance’s SlimFit series and the Klipsch R-1650-CSM are designed for cavities as shallow as 2.5 inches.
Stereo in-ceiling speakers put both left and right channels in a single enclosure, with two sets of drivers aimed slightly apart. They’re a practical solution for small rooms where running two speaker locations isn’t cost-effective. The Polk Audio 70-RT is a popular example.
How Installation Actually Works
In-ceiling speaker installation is a two-phase project: rough-in (or pre-wire) and trim-out. Understanding both matters because the rough-in happens during construction or remodeling, when walls are open, and the trim-out happens at the end of the project.
Rough-in / Pre-wire phase
During framing, an electrician or low-voltage contractor runs 16-gauge or 14-gauge speaker wire from each speaker location back to a central amplifier location, typically an AV rack in a closet, mechanical room, or dedicated equipment room. The wire gets coiled and labeled at each junction box location and stapled to framing. Common speaker wire is sold on 500-foot and 1,000-foot spools. Expect to use 50 to 150 feet per speaker run depending on the house layout.
Wire gauge matters more than people think. At 16 AWG, resistance becomes a factor over runs longer than about 50 feet on 4-ohm speakers. 14 AWG is the safer choice for runs over 50 feet or for low-impedance loads. For distributed audio systems with 70-volt commercial-style distribution, the wiring method is different and the impedance math changes entirely.
Box locations get framing if needed. Standard drywall backing for in-ceiling speakers is just the drywall itself (in-ceiling models use dog-ear clips that clamp against the drywall from behind), but in-wall speakers often need a rough-in bracket, especially for high-end models that specify an enclosure box.
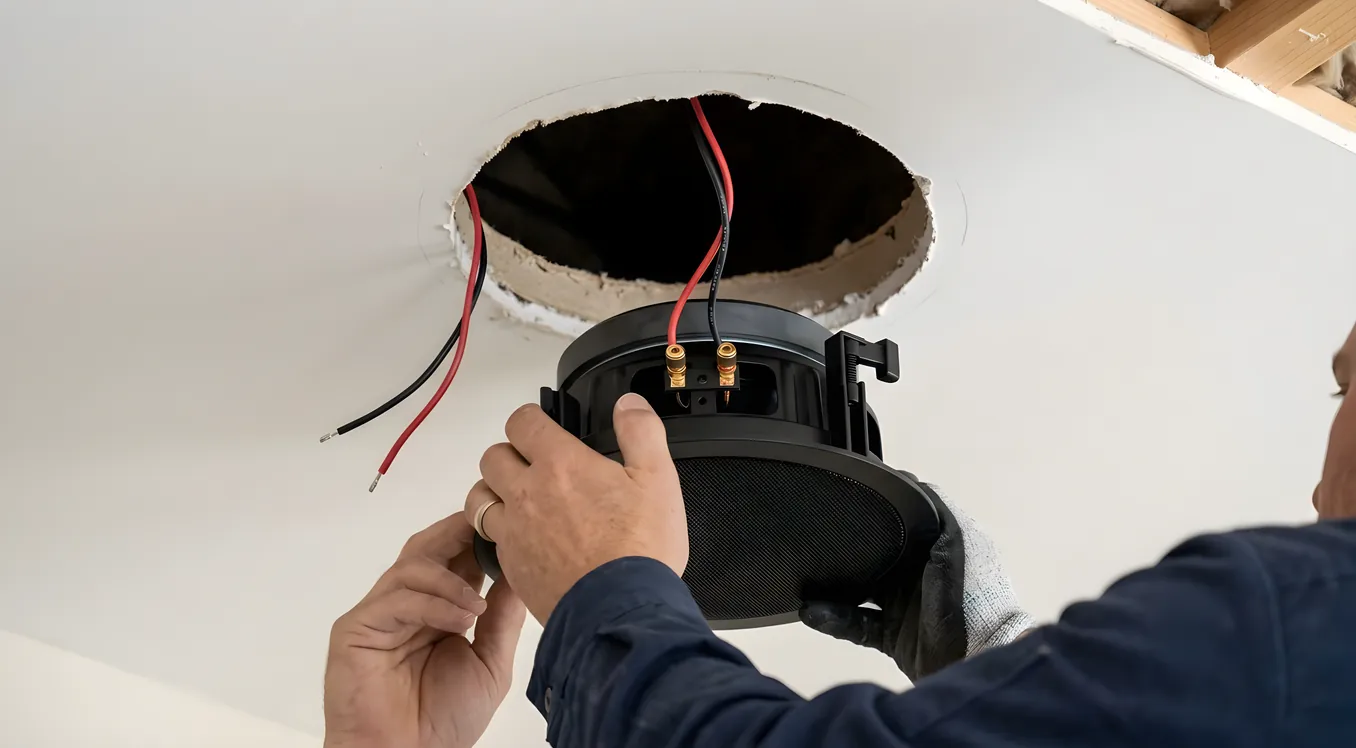
Trim-out phase
Once drywall is finished, taped, and primed, the low-voltage crew comes back to pull the wire through, cut the openings with a hole saw (usually 9 to 10 inches for a 6.5-inch speaker, per the template that ships with the speaker), drop the speaker into the opening, and tighten the dog-ear clamps. Grilles snap or magnetically attach. The whole process for a single speaker is 15 to 25 minutes once the pre-wire is in place.
In existing homes without pre-wire, retrofit installation requires fishing wire through finished walls, which is significantly more labor-intensive. Costs double or triple compared to new construction. Installers use a combination of fishing rods, drill bits extended with flexible shanks, and wall scanners to route wire without opening large sections of drywall. Attic access above the installation floor simplifies this considerably.
Costs: What to Budget
Speaker hardware and installation costs vary widely, but the numbers below reflect real project ranges in 2026.
Speaker hardware per pair:
- Entry level (Polk Audio RE Series, Klipsch Reference series): $80 to $200 per pair
- Mid-range (Klipsch CDT-5650, Monitor Audio Core, Sonance VP): $250 to $600 per pair
- High performance (Sonance Architectural Portrait, Bowers & Wilkins CCM Series, James Loudspeaker): $600 to $2,000+ per pair
Pre-wire labor (new construction):
- $80 to $150 per speaker location, including wire and connection to the amp rack location
Retrofit installation (existing walls, wire fishing required):
- $200 to $500 per speaker location depending on accessibility
Amplification:
- Whole-house multi-zone amplifiers from companies like Monoprice, Russound, Sonos Amp, or Triad Audio range from $200 for a basic two-zone unit to $1,500 or more for 8-zone models with app control
- High-end integrators running Control4 or Crestron systems use Triad, Anthem, or NAD amplifiers starting around $2,000 per rack unit
Complete system estimates:
- 4-zone house (8 speaker pairs, pre-wire only): $3,500 to $6,000 installed
- 4-zone house (retrofit): $7,000 to $12,000 installed
- High-performance media room with in-wall surround system: $8,000 to $25,000 depending on speaker grade and amplification
These numbers don’t include the streaming source or control system. If you’re building a whole-house audio system from scratch, the source equipment, network infrastructure, and control interface add another layer to the budget.
Choosing Speakers: What Actually Matters
Impedance and sensitivity:
Most residential in-ceiling speakers are 8-ohm nominal impedance. Some performance models drop to 4 ohms. Your amplifier’s output impedance spec must match. Sensitivity (measured in dB at 1 watt at 1 meter) tells you how loud the speaker plays per watt of input. A 90 dB sensitive speaker plays noticeably louder on the same amp than an 85 dB sensitive speaker. For background listening levels in a kitchen or bathroom, this doesn’t matter much. For a media room, it does.
Frequency response:
The spec sheet shows the range in Hz and how flat the response is. A speaker rated 60 Hz to 22 kHz at plus or minus 3 dB is meaningfully flatter and more accurate than one rated 50 Hz to 20 kHz at plus or minus 6 dB. The tolerance matters as much as the range. For music listening, target speakers with response flat within 3 dB down to at least 80 Hz. A separate subwoofer handles everything below that.
Woofer material:
Polypropylene cones are durable, moisture-resistant, and sound fine. Fiberglass and Kevlar-reinforced cones cost more and handle higher power before distortion. For bathrooms and kitchens (humidity, cooking grease), polypropylene is the better practical choice. For a dedicated music room, the higher-grade cone materials justify the cost.
Tweeter type and dispersion:
Dome tweeters are the standard. Silk dome tweeters sound warm and are forgiving of poor room acoustics. Aluminum dome tweeters are brighter and more detailed but can sound harsh in rooms with hard surfaces. Pivoting tweeters extend the sweet spot, which matters for off-axis listening positions.
Smart Home Integration: How These Connect
In-ceiling speakers in a smart home don’t operate in isolation. They’re endpoints in a distributed audio system that has a source layer, a distribution layer, and a control layer.
Source layer:
Streaming sources include Sonos Amp (which turns passive speakers into Sonos-controlled zones), Apple AirPlay 2 receivers, and dedicated network audio devices from brands like Bluesound and NAD. High-end integrators use Control4 or Crestron to aggregate multiple sources (streaming services, local NAS libraries, cable TV audio) and route them to any speaker zone.
Distribution layer:
Multi-zone amplifiers take audio from one or more sources and distribute it to speaker pairs throughout the house. Russound’s MCA-C3 handles 3 zones. The Sonos Amp handles one zone per unit, but multiple units sync wirelessly. The Triad Audio TA-4100 handles 4 zones from a single rack unit. For large homes, integrators stack multiple units or use matrix switching for more source-to-zone flexibility.
Control layer:
This is where smart home integration pays off. Voice control via Amazon Alexa or Google Home can trigger zone on/off and volume. Control4 and Crestron allow context-aware audio, meaning the system can know you’re watching a movie in the media room and automatically lower the kitchen speakers when someone walks in to avoid competing audio. Lutron lighting keypads can include audio scene controls. The same “Good Morning” routine that raises shades can trigger a playlist in the kitchen.
Volume control locations matter. In-wall volume controls (Leviton, Russound, or speaker-brand matched units) give physical adjustment at each room. For smart home integration, these compete with app control and voice, but having physical controls in every room adds reliability when the network is down.
Where to Put Them
Speaker placement is the most commonly underestimated part of in-ceiling audio. The standard guidance from installation manuals assumes the room is empty and the listening position is centered, which is rarely true.
Kitchens:
Two speakers spaced about one-third of the room’s length from each end, centered over the cooking and eating zones. If there’s an island, bias the placement toward where people stand while cooking. Avoid placing speakers directly over the cooktop; grease vapor and heat accumulate near hoods.
Great rooms and living rooms:
Two speakers for background audio, four speakers for better stereo imaging. For four-speaker setups, place them at the corners of the primary seating area, roughly 2 feet in from each wall. This spreads the sound evenly across the seating group rather than making only the person in the center hear it properly.
Master bedrooms:
One stereo speaker or two speakers positioned over each side of the bed work well for background listening and sleep audio. Avoid placing speakers too close to the headboard wall where they’ll create strong early reflections.
Bathrooms:
One speaker for smaller bathrooms, two for master bath suites. Use moisture-rated (often labeled for marine or outdoor use) speaker models if the installation is within 3 feet of a shower or steam source. Polk Audio, Klipsch, and Sonance all make moisture-rated in-ceiling models.
Outdoor patios and covered spaces:
Covered outdoor spaces can use standard in-ceiling speakers rated for damp locations. Fully exposed outdoor areas need fully weatherproof speakers. The outdoor audio and video systems section covers the specific requirements for exterior installations.
Common Mistakes (and How to Avoid Them)
Running too few speaker locations during rough-in:
Pre-wire is the cheapest it will ever be during construction. Adding a speaker location in a finished room costs 5x to 10x more. When in doubt, run wire to more locations than you think you need and cap them off. You can always choose not to install a speaker in a pre-wired location.
Skipping the subwoofer:
In-ceiling speakers in a media room sound thin without a subwoofer. A single 10-inch or 12-inch in-wall subwoofer from Sonance or SpeakerCraft, properly positioned, transforms the system. Budget $600 to $1,500 for the sub and the same installation labor as a speaker pair.
Mismatching impedance:
Daisy-chaining speaker pairs in parallel on a single amplifier output drops the combined impedance and can damage the amplifier. Each speaker pair should run to its own amplifier channel. This is why multi-zone amplifiers matter.
Choosing speakers before choosing amplification:
The amplifier determines which speakers work. If you buy 4-ohm speakers and your amplifier is only stable at 8 ohms, you’ll have a problem. Start with the amplifier specification (or the system integrator’s recommendation) and work backward to the speakers.
Not planning for service access:
High-end speaker installations use terminal blocks or speaker connectors at the rough-in stage, not direct wire connections. This allows the speaker to be removed and replaced without cutting wires. For a $1,500 speaker pair, this is worth the extra $10 in hardware.
What a Custom Integrator Actually Does Differently
The difference between a DIY in-ceiling installation and a professional custom installation is not primarily the speakers (though the hardware grades differ). It’s the system design.
A custom integrator like those working with Control4, Savant, or Crestron platforms designs the entire signal chain before anything goes in the wall. Speaker placement is modeled against the room geometry. Amplifier headroom is calculated against the number of zones and peak listening levels. Wire gauges are specified to the run length. The whole system is designed as an integrated whole, not assembled from components that happened to be available.
For a smaller project with three to five zones and a budget under $10,000, a dealer working with a Sonos Amp or Russound-based system can produce excellent results without the overhead of a full Control4 deployment. For larger homes with eight or more zones, integration with a home automation platform like a media room automation setup where one button triggers a complete scene, or a distributed video system where audio follows the video signal, a full custom integration is the more reliable path.
Brands like Sonance and James Loudspeaker sell primarily through custom integrators rather than retail because their products are designed for system-level installation. The speakers are only part of what you’re paying for.
What to Ask Before You Commit
Before signing an installation contract, these questions surface the variables that most estimates don’t cover:
What is the plan for getting wire from the speaker locations to the equipment location? Specifically, what obstructions exist (fire blocks, structural members, HVAC chases) and how does the estimate account for them?
What amplifier platform are you specifying and why? Is it replaceable if that brand discontinues the product in five years?
What is the ongoing service relationship? Can you swap a speaker grille or adjust a volume control without calling a technician?
Are the speaker locations modeled or estimated? Did someone look at the room layout and calculate coverage, or are they using a standard “two speakers per room” rule of thumb?
Is the equipment rack ventilated and accessible? Amplifiers generate heat and need service access.
Getting specific answers to these questions separates vendors who install speakers from integrators who design audio systems.
Getting the Most from Hidden Audio
In-ceiling and in-wall speakers have become the default choice for whole-house audio because they solve real problems. They don’t clutter rooms. They distribute sound evenly. They integrate cleanly with smart home control systems. And because they’re infrastructure, they add to the home’s value in a way that a rack of free-standing equipment doesn’t.
The investment pays off most when the pre-wire happens early, the amplification is specified before the speakers, and the speaker placement is calculated rather than guessed. Getting those three things right produces a system you’ll use daily without thinking about it, which is the point of good invisible audio.