Media Room Automation: One-Button Movie Night
The concept sounds like marketing copy until you actually use it. You press one button, labeled “Movie Night” on a keypad or touchscreen, and your media room responds: the motorized shades drop, the projector warms up, the receiver powers on, the screen descends from the ceiling, the Dolby Atmos system sets to your preferred listening level, and the lights dim to 5 percent amber. Four seconds later, you’re sitting in darkness with a 120-inch image in front of you, and you haven’t touched a single remote.
That’s media room automation done right. Not a voice command that half-works, not an app that requires four taps and two loading screens. A physical button that does what you’ve told it to do, every time, without fail.
This article explains how that system actually gets built: which components need to talk to each other, which control platforms are worth the money, what the wiring and programming looks like behind the scenes, and what you should expect to spend at different budget levels.
Why Dedicated Media Rooms Deserve Dedicated Automation
A living room TV setup and a true media room are fundamentally different environments, and automation addresses each differently. Living room setups tend to involve compromise: the lighting can’t get fully dark because it’s also a social space, the speakers can’t be optimally placed because there’s traffic in the room, and the viewing angle accommodates several seats at varying distances.
A dedicated media room is optimized for one thing. The room is sealed from outside light. Acoustic treatment absorbs reflections. Seating is arranged at precisely calculated distances from the screen. Equipment racks are hidden in a closet or behind panels. When you build a room for that purpose, manual control creates friction that the environment itself doesn’t need. You already bought the motorized screen, the reference-grade projector, the acoustic panels. Asking someone to power on six components in sequence and hit the right input on each defeats the point.
Automation eliminates that friction at the moment when it matters most: when you want to watch something. It also ensures that the room shuts down completely when you’re done, protects expensive equipment from being left on unnecessarily, and lets guests use the room without a 10-minute tutorial.
The Core Components of a Media Room Automation System
Getting to one-button control requires several categories of hardware to be tied together under a single control system. Here’s what that actually means in practice.
The Control Processor
This is the brain. The processor executes scenes, sends commands to devices, monitors status, and handles the sequencing that makes a “Movie Night” scene work correctly. The major residential platforms are Control4 (now part of Snap One), Savant, and Crestron. For standalone setups without a whole-home system, Elan is another capable option.
Control4’s EA-1 processor starts around $600 for the hardware alone, handling a single room or small zone. The EA-3 ($1,200 to $1,500) handles multi-zone setups and is the more common choice for a media room paired with a couple of other zones. Programming and installation labor is separate and typically runs $1,500 to $4,000 for a media room depending on complexity.
Crestron is the premium tier. Their residential CP4-R processor runs $3,000 to $4,500 and is built to commercial-grade tolerances. If you’re spending $80,000 or more on a media room, Crestron is the appropriate control platform. For most residential projects, Control4 and Savant deliver excellent results at meaningfully lower cost.
A/V Equipment with Two-Way Control
Not all A/V equipment can be automated effectively. The difference is two-way communication. A receiver that only accepts IR (infrared) commands can be turned on, but the processor can’t confirm it’s actually on. A receiver with RS-232, IP control, or two-way IR can report its status back to the processor. Control4 and its drivers library rely heavily on this distinction.
For projectors, two-way control matters enormously because projector lamps (and even laser light engines) have warm-up sequences that take 30 to 90 seconds. A properly programmed scene delays dependent actions (screen descend, receiver power) until the projector confirms it’s ready. Without two-way control, you’re guessing.
Common media room projectors with solid driver support include the Sony VPL-XW7000ES (around $10,000, native 4K, 3,200 lumens, laser), the JVC DLA-NZ7 ($8,000, 8K e-shift, laser), and more accessible options like the Epson Pro Cinema LS12000 (around $3,500, 4K laser). All three have established two-way control drivers for Control4 and Savant.
AV Receivers and Processors
Denon, Marantz, and Integra all make IP-controllable receivers with solid driver support. The Denon AVR-X8500HA ($3,500) supports 13.4-channel processing with Dolby Atmos, DTS:X, and Auro-3D, and its IP control interface is rock-solid. For audio processors without amplification, the Marantz AV10 ($4,000) or Trinnov Altitude ($8,000 to $20,000 depending on channel count) are the reference choices for serious setups.
Motorized Shading
If your media room has any windows, motorized blackout shades are not optional for serious viewing. Lutron’s RadioRA 3 and Ketra systems integrate natively with Control4 and Savant. A single motorized roller shade from Lutron Sivoia QS runs $500 to $1,200 installed depending on window size. A media room with four windows might see $3,000 to $5,000 in shading alone. Hunter Douglas PowerView shades also have strong integration support and come in at slightly lower price points.
Lighting Control
Lighting in a media room needs to do several things: dim smoothly to very low levels without flickering or buzzing, shift to warmer color temperatures in evening modes, and respond instantly to scene commands. Lutron’s RadioRA 3 dimmers are the residential standard, running $80 to $150 per dimmer for the hardware. They communicate via Lutron’s proprietary RF protocol, which means reliable control even if your home network has issues.
For color-tunable accent lighting behind the screen or along the floor, Ketra or Lutron’s own tunable white fixtures let the system shift from neutral white during previews to warm amber during the film. This matters because your eyes adapt to the ambient light level, and warm low-level accents reduce eye strain during dark scenes.
Motorized Screen and Screen Mask
For projector setups, a motorized screen is a given. The key automation consideration is two-way control (same principle as projectors). Screen Innovation, Stewart Filmscreen, and Elite Screens all offer screens with contact closure or RS-232 control that confirm position. Stewart’s Phantom HALZ screen (around $6,000 to $15,000 depending on size) is a common choice for custom installs. Elite Screens offers capable alternatives starting around $800 for motorized options.
Masking screens that adjust to fill 16:9, 2.39:1, or other aspect ratios are the next level. A motorized 4-way masking screen from Stewart or Screen Research runs $8,000 to $25,000, but for cinephiles who watch a lot of scope-ratio films, the experience of having the black bars be actual black (masked screen) rather than projected black is genuinely different.
Programming the “Movie Night” Scene: What Actually Happens
Behind the one button press is a sequence that a Control4 or Savant programmer builds in their respective software. Here’s what a fully automated “Movie Night” scene might actually execute, in order:
- Send “lower” command to motorized shades in the media room.
- Start 3-second delay (allowing shades to begin their travel).
- Send power-on command to the projector.
- Monitor projector status via IP; wait for “lamp ready” confirmation.
- Once projector confirms ready, send “lower” command to the motorized screen.
- Power on the AV receiver/processor.
- Set receiver to the correct input (HDMI 1, or whatever the primary source is).
- Set receiver to “Movie” EQ mode.
- Set receiver volume to preset level (-18dB in this example).
- Send “dim to 5%” command to media room overhead lights.
- Set accent lighting to warm amber at 10%.
- If a streaming device like an Apple TV 4K is the source, wake it and navigate to the last app.
The whole sequence takes about 45 to 90 seconds depending on projector warm-up time. The user presses one button and waits. When they walk back to their seat with snacks, everything is ready.
The “End Movie” scene runs in reverse, with one addition: it sets the lights to 40% neutral white before any other action, so people aren’t navigating a dark room during shutdown.
This kind of scene sequencing is where the value of a proper control system over an app-based smart home becomes clear. SmartThings, Home Assistant, and similar platforms can do basic on/off automation, but handling the status polling, error recovery, and precise timing that a media room scene requires is significantly more complex to implement reliably. A Crestron or Control4 programmer does this every day and builds it into the system configuration properly.
Integration with Whole-Home Audio and Video
A media room doesn’t exist in isolation. If your home has a whole-house audio system, the media room processor ties into it: when “Movie Night” starts, the system can mute or pause audio playback in adjacent zones so it doesn’t bleed through the walls. When the movie ends, the system can restore the prior state.
For homes with a distributed video system, the media room source can be one of several inputs available throughout the house. A Snap One (formerly Black Box and Binary) matrix switcher can route a 4K HDR signal from the media room Apple TV or Blu-ray player to a TV in the kitchen or bedroom. The media room automation system can include controls for that routing.
Sonos integration is worth noting specifically. Control4 has a native driver for Sonos that allows full integration: you can include a Sonos Port or Sonos Amp as a zone in your media room scene, control it via the same Control4 interface, and include it in whole-home shutdown scenes. If you’re comparing a Sonos-based approach to custom-installed audio for your media room, the Sonos vs custom-installed audio breakdown covers where each makes sense. For a dedicated media room, a custom-installed system with a proper AV processor and in-wall or in-ceiling surrounds will outperform Sonos on dynamics and soundstage, but Sonos is an appropriate choice for the casual secondary zones that feed off the same ecosystem.
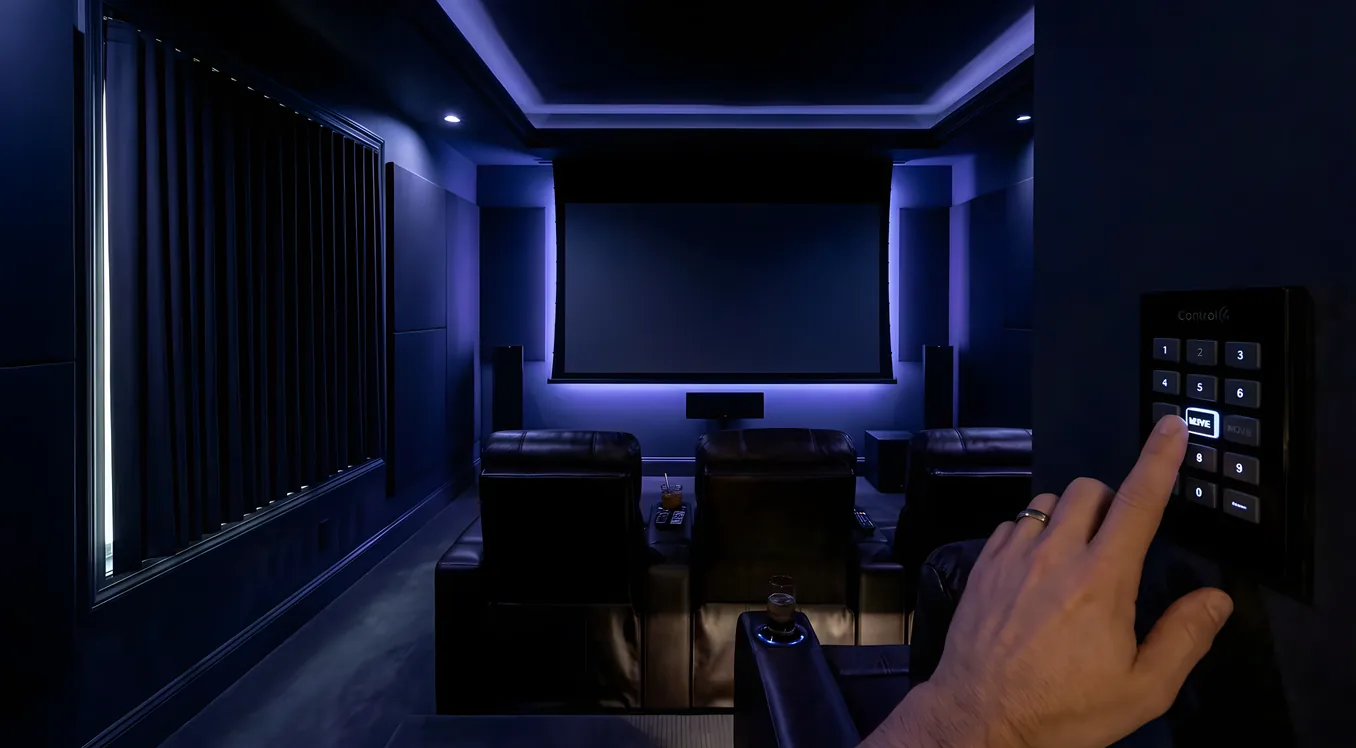
User Interfaces: Keypads, Touchscreens, and Remotes
The “one button” in “one-button movie night” can live in several places simultaneously.
Wall Keypads: Lutron’s Palladiom keypads (around $200 to $400 per keypad) or Control4’s own keypads give you physical buttons with engraved labels. A 4-button keypad in the media room might have: Movie Night, Sports, Kids, and All Off. These feel right because pressing a physical button is faster and more reliable than pulling out a phone.
Touchscreens: Control4’s T4 Series touchscreen panels (7-inch model around $800 to $1,200) mount in the wall or sit on a tabletop. They show full media control, now-playing information, thermostat status, and security camera views. In a media room, one is typically mounted near the entrance and another on the side table.
Remote Controls: Control4’s R300-Z ($150) and Neeo remote (around $250) work with RF rather than IR, so you don’t need line-of-sight. Josh.ai is an increasingly common voice control layer that sits on top of Control4 or Crestron and handles natural language commands with significantly better accuracy and privacy than Alexa or Google Home.
App Control: All three major platforms (Control4, Savant, Crestron) have mobile apps. These are good for secondary control, particularly when you want to adjust volume or pause from your seat without picking up a physical remote. They shouldn’t be the primary interface because they require unlocking your phone, finding the app, and waiting for it to connect.
What Does a Proper Media Room Automation System Cost?
The honest answer is that costs vary significantly based on room size, existing infrastructure, and how deep you go on the AV side. Here are realistic ranges:
Entry-level media room automation ($8,000 to $20,000 total A/V and automation)
This gets you a Control4 EA-1 or EA-3 processor, Lutron RadioRA 3 lighting control for the room, motorized blackout shades on 2 to 3 windows, a capable 4K projector in the $3,000 to $5,000 range (Epson LS12000 or BenQ W5700S), a 110-inch motorized screen, a Denon or Marantz AV receiver, and a 5.1 or 7.1 speaker system with in-wall surrounds. Programming and installation typically runs $3,000 to $5,000 at this level.
Mid-range ($25,000 to $60,000)
At this level, you’re looking at a Sony or JVC laser projector in the $8,000 to $12,000 range, a Trinnov or Datasat audio processor, a 7.4.4 Dolby Atmos speaker layout with in-ceiling and in-wall speakers from Bowers & Wilkins, Triad, or Leon, a Stewart or Screen Innovation motorized screen in the $6,000 to $10,000 range, acoustic panel treatment, a Control4 EA-3 or Savant system with multiple touchscreens and keypads, and full integration with the rest of the home’s lighting and climate systems. This is the range where most serious custom installs land.
High-end ($75,000 to $250,000+)
This tier adds Crestron control, reference-grade audio from Meridian or KEF, 4-way masking screens, a JVC projector with an anamorphic lens for 2.39:1 native scope, acoustic design by a dedicated AV designer, custom millwork for equipment concealment, and potentially a second processing layer like a Datasat RS20i (around $10,000) for room correction and bass management. Rooms at this budget often include acoustic consulting fees, premium seating from Fortress or Cineak, and full integration with a Crestron or Savant whole-home system.
Design Considerations That Affect Automation
The equipment decisions and the room design decisions interact directly. A few specifics worth knowing before you finalize either:
Projector Throw Distance: If your media room is 18 feet deep and you want a 120-inch screen, a standard throw projector needs to sit approximately 12 to 15 feet from the screen, which is likely in the middle of the seating area. A short-throw projector (like the Epson LS500 at around $2,800) can sit 4 to 5 feet from the screen, but that placement affects screen selection and sight lines. The projector location affects where you run conduit, which affects where the equipment rack goes, which affects control wiring runs.
Equipment Rack Placement: Heat management is the most common mistake. AV components generate significant heat, and piling them in a sealed closet without airflow kills equipment. Proper media room design includes a dedicated equipment room or closet with perforated rack shelves, a Rackmount cooling system (Middle Atlantic or Liebert), and at minimum a temperature sensor in the rack connected to the automation system that can alert you if temperatures exceed thresholds.
Acoustic Treatment and In-Ceiling Speakers: If you’re mounting in-ceiling speakers for Atmos height channels, the acoustic treatment plan needs to account for them. This requires deciding early: full ceiling coverage with panels, clouds, or a coffered soffit approach all interact differently with speaker placement and the geometry of ceiling speaker cutouts.
The Ongoing Reality of a Media Room System
Any system with this many interconnected components will occasionally need service. Driver updates, firmware updates, and occasional glitches are part of the reality. This is why the relationship with your integrator matters beyond the initial installation. Control4 dealers typically offer service agreements ranging from $500 to $2,500 per year depending on system size, which covers software updates, remote support, and a certain number of on-site visits.
Equipment ages and gets updated. When you buy a new streaming device or your projector bulb (or laser module) eventually needs replacement, those components need to be integrated properly. Keeping your integrator informed of changes, rather than plugging in new devices yourself, avoids the “the remote doesn’t work anymore” calls that come from adding an unregistered component.
Getting to One Button: Practical Next Steps
If you’re building a new media room or retrofitting an existing one, the sequence that tends to work best is:
First, decide on the primary use case and seating configuration. Screen size and projector throw distance flow from those decisions. Second, select the control platform before finalizing AV equipment, because some equipment integrates better with specific platforms. Third, bring your integrator in during the design phase, not after framing is complete. Running conduit through an unfinished wall costs a fraction of what it costs through a finished one.
The media room is the space in a home where automation delivers its clearest, most tangible return. Every other room has competing use cases. The media room has one job, and a properly automated system lets it do that job without asking anything of the people who use it.
That’s what one button actually means: you’ve done all the configuration work once, and the system executes it perfectly every time after that.