Smart Radiant Floor Heating: Hydronic and Electric Control
Radiant floor heating is one of those things that sounds like a luxury until you’ve lived with it. Step out of bed on a January morning onto a warm tile floor and the comparison to forced-air heating becomes uncomfortable to admit. But the intelligence layer on top of that warmth is what separates a basic heated floor from a system that actually saves you money and adapts to how you live.
The appeal of smart radiant floor heating goes beyond comfort. Radiant heat operates at lower water or surface temperatures than forced-air systems, which means it can run more efficiently, and that efficiency compounds when you add smart controls that stop heating empty rooms at the wrong times. The problem is that most homeowners who have radiant systems are running them on outdated manual thermostats, and most homeowners considering radiant heat don’t understand the fundamental difference between hydronic and electric systems well enough to make a sound decision. This article covers both.
Hydronic vs Electric: The Decision You Make First
Radiant floor heating divides into two completely different technologies that share a name and an outcome but almost nothing else. Getting this wrong early means either underbuilding for your actual needs or spending significantly more than you have to.
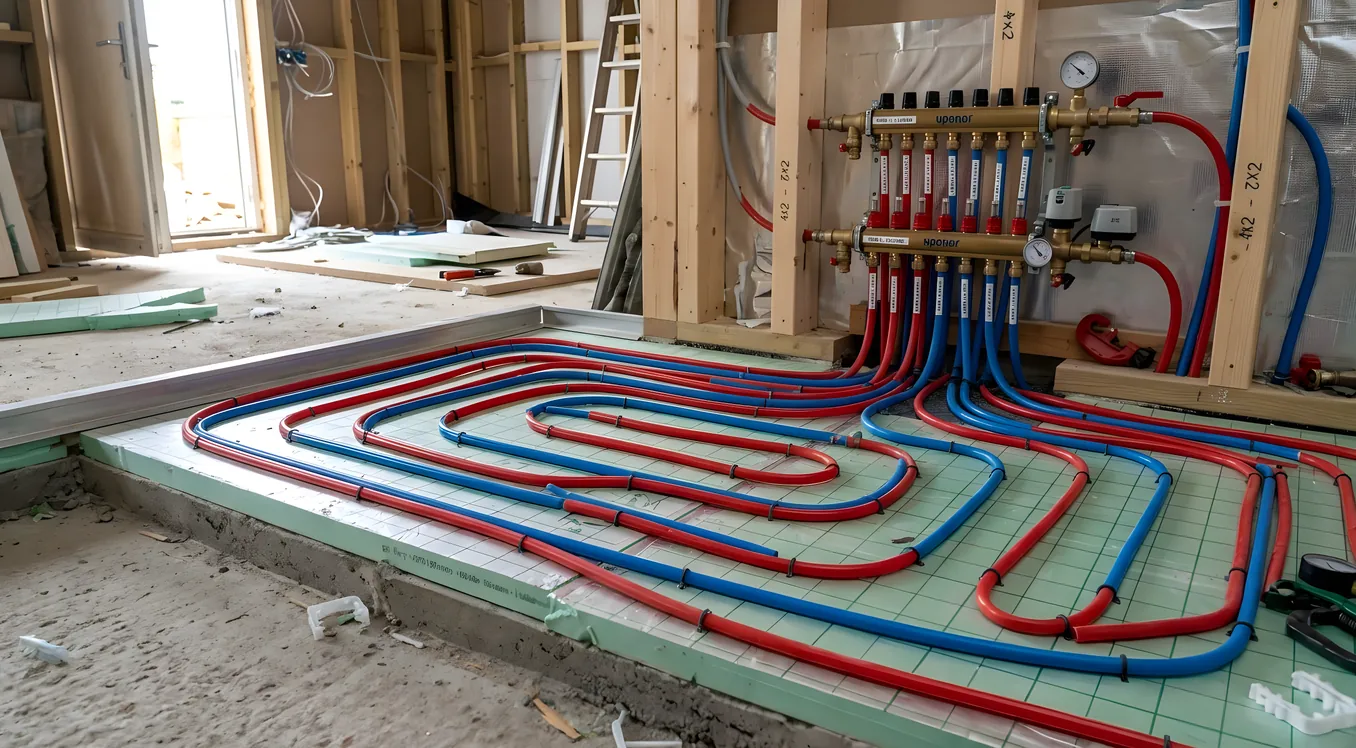
Hydronic (water-based) systems run warm water through cross-linked polyethylene (PEX) tubing embedded in the floor slab or stapled beneath the subfloor. The water comes from a boiler, a heat pump water heater, or a geothermal system. A hydronic system heating a 2,000 square foot home typically requires a boiler in the 50,000 to 80,000 BTU range, 2,000 to 4,000 feet of PEX tubing (depending on loop spacing, usually 6 to 12 inches on center), manifolds for each zone, zone valves or circulators, and a mixing valve to control water temperature entering the loops (typically 85 to 120 degrees Fahrenheit, well below a standard domestic hot water heater’s 120 to 140 degree output).
The installation cost for hydronic radiant in new construction runs $6 to $15 per square foot depending on the system complexity, the boiler type, and the number of zones. A 2,000 square foot home could cost $12,000 to $30,000 for the full hydronic installation. In a retrofit, costs jump significantly because you’re either lifting flooring or working with a staple-up configuration that adds labor and reduces efficiency.
Electric radiant systems use resistance heating cables or heating mats embedded in thin-set mortar beneath tile, or installed over a subfloor under other flooring types. They’re powered directly from your electrical panel and controlled by a line-voltage or low-voltage thermostat. Electric systems cost $8 to $15 per square foot installed for the heating element itself, but that doesn’t account for electrical upgrades. A typical bathroom installation (50 to 100 square feet) might run $600 to $1,500 all-in. A whole-home electric radiant installation would be unusual except in very mild climates, because the operating cost math doesn’t work: electric resistance heat at $0.12 to $0.20 per kilowatt-hour is significantly more expensive per BTU than a hydronic system heated by a gas boiler or a heat pump.
Where electric radiant shines is targeted room heating: bathrooms, mudrooms, kitchen islands, and other areas where you want comfort underfoot without the cost of whole-home hydronic infrastructure. Where hydronic shines is whole-home primary heat in climates that see real winters.
The smart controls story differs substantially between the two, and that matters for how you integrate everything into a home automation platform.
Smart Controls for Electric Radiant Systems
Electric radiant systems use thermostats that sit in the wall like any other thermostat, but they’re line-voltage devices operating at 120V or 240V rather than the 24V low-voltage signal a forced-air thermostat uses. That distinction matters because not every thermostat is rated for line-voltage use, and wiring them wrong is a fire hazard.
Nuheat and Warmup are the two brands that dominate the smart electric radiant thermostat market.
The Nuheat Signature thermostat ($175 to $195) is a 120/240V programmable unit with Wi-Fi built in. It pairs with the Nuheat app for scheduling, remote control, and usage monitoring. The scheduling interface lets you build a 7-day program with up to 6 periods per day. One useful feature is the “Early Start” function, which learns how long your floor takes to reach target temperature and starts heating early enough to hit it by your wake time, rather than starting at wake time and delivering comfort 45 minutes later. For a bathroom with a floor sensor under the tile, this makes a real practical difference.
The Warmup 4iE ($200 to $230) takes a similar approach with SmartGeo technology that detects when you leave home via your phone’s GPS and can shift to energy-saving mode automatically. It integrates with Google Home, Amazon Alexa, and has an IFTTT pathway for homeowners trying to connect it to broader automation. Warmup’s app shows real-time wattage draw and running costs if you input your electricity rate, which helps you understand the actual operating cost of your bathroom heat.
For deeper integration into professional smart home platforms, the options narrow. Crestron and Control4 can integrate electric radiant thermostats through Z-Wave or Zigbee bridges in some cases, but the more reliable path for a professionally integrated home is using a relay module controlled by the automation system to switch the thermostat’s setpoint via a 0-10V signal or a contact closure. It’s workable but not elegant. If your entire home is running on a Control4 or Savant platform and you want your heated bathroom floor to be part of “Good Morning” routines, budget for the integration work or consult your integrator about which specific thermostat models they’ve successfully connected.
Smart Controls for Hydronic Radiant Systems
Hydronic radiant systems have a richer and more capable smart control landscape because the infrastructure already involves zone valves, circulators, manifolds, and a boiler, all of which are addressable.
Watts Radiant (now part of Watts Water Technologies) and Uponor are the dominant hydronic components manufacturers. Their systems use zone valves at the manifold, actuated by a 24V signal from a zone controller. A standard setup uses a controller like the Watts Zone Control Center, which receives thermostat signals from each room and opens the corresponding zone valve while firing the boiler or circulator.
For smart integration, Tekmar (another Watts brand) makes the tha 487 wireless thermostat system designed specifically for hydronic radiant. The tha 487 communicates with a gateway that can connect to home automation systems via Modbus or BACnet. It understands the thermal mass of a radiant system inherently. Unlike a standard thermostat that expects near-immediate response, Tekmar’s algorithms account for the fact that a slab-on-grade radiant system might take 45 minutes to 2 hours to change meaningfully after a setpoint change.
The Honeywell Home (now Resideo) T6 Pro and T9 thermostats can control hydronic zone valves on 24V systems, and both have Wi-Fi with Alexa and Google Home integration. The T9 adds remote room sensors, which can be valuable when your thermostat is in one part of a large open floor plan but the zone you care about is on the other end. The T9 Smart Thermostat retails for around $150 to $170.
Ecobee thermostats can work with hydronic radiant on 24V systems, and ecobee’s SmartSensor ecosystem (each sensor around $79) lets you optimize which rooms influence the heating decision. For a split-level home with hydronic radiant on the main floor and forced air upstairs, pairing an ecobee with the right sensor placement gives you a single interface that manages both systems intelligently. The smart thermostat comparison covering Nest, ecobee, and professional HVAC controls goes deeper on how these platforms handle multi-zone and multi-system homes.
For professional installations, Uponor offers the Smatrix Base and Smatrix Plus zone controllers, which communicate wirelessly between room thermostats and the central controller. The Smatrix Plus PULSE Pro (model R-208) is their top-tier controller, supporting up to 8 zones wirelessly, an open API for integration with Crestron, Control4, and KNX, and a dedicated mobile app. This is the kind of system a professional integrator installs when building a truly smart hydronic house rather than retrofitting app control onto a dumb zone valve setup.
Zoning: Why It Matters More Than Thermostat Brand
The biggest efficiency gain in smart radiant floor heating doesn’t come from picking the right thermostat app. It comes from proper zoning combined with controls that actually use those zones.
A common mistake in hydronic radiant installations is treating the whole first floor as a single zone to save on manifold and valve costs. The result: you heat the guest bedroom at the same time you heat the kitchen, even though the guest bedroom is empty 28 days out of 30. Adding a zone valve for an additional room costs $150 to $300 in parts plus labor, which pays back quickly in operating costs if the zone control is actually smart about scheduling.
Good zoning design for radiant heat considers thermal load (how quickly each room loses heat based on windows, exterior walls, and insulation), occupancy patterns (master bedroom is occupied at night, home office is occupied during the day, guest rooms are rarely occupied), and floor covering (tile over radiant transmits heat efficiently; carpet is insulating and changes the system’s effective output significantly).
Integrating with zoned HVAC and smart damper systems creates an opportunity for homes that have both radiant floors on the main level and forced-air systems handling upper floors or cooling. The smart home controller can coordinate: radiant handles the ground-floor heat load while forced air handles dehumidification and cooling in shoulder seasons, with a unified schedule that doesn’t fight itself.
Energy Monitoring and Operating Costs
Hydronic radiant operating costs depend primarily on your boiler’s fuel cost and efficiency and your outdoor reset curve. A condensing gas boiler running at 95 AFUE (Annual Fuel Utilization Efficiency) and heating a well-insulated 2,000 square foot home in a 6,000 heating degree day climate might consume 700 to 900 therms of gas per year for radiant heat, at current rates of $1.00 to $1.50 per therm, that’s $700 to $1,350 annually.
The outdoor reset control is where smart technology really earns its keep in hydronic systems. Outdoor reset adjusts the boiler’s supply water temperature based on outdoor conditions: colder outside means hotter water, milder outside means cooler water. Running a slab at 90 degrees on a 45-degree day instead of 115 degrees keeps the boiler in condensing mode longer, which improves efficiency by 10 to 15 percent in shoulder seasons. Controllers like the Tekmar 256 Boiler Control handle this automatically, and they’re one of the highest-ROI controls investments in a hydronic system.
Pairing radiant heat with energy monitoring lets you see exactly what your heating system is drawing and correlate it with weather data, occupancy schedules, and thermostat setpoints. Whole-home energy monitoring systems from platforms like Emporia Energy (Vue 3 at $199), Sense (at $349), or eGauge (commercial-grade at $499 to $699) can monitor individual circuits. For electric radiant in a bathroom, putting that circuit on a monitored breaker gives you actual data on what that floor heater costs per month, which is information most homeowners have never had access to before.
If you’re considering a heat pump or solar combination for your hydronic system, the economics shift considerably. A heat pump water heater as the heat source for a low-temperature radiant system (supply temperature at 100 to 110 degrees Fahrenheit, which heat pump water heaters can achieve at a COP of 3 to 4) can cut operating costs by 60 to 70 percent compared to a resistance electric system. Solar and smart home integration addresses how to stack solar production against a heat pump radiant load intelligently, time-shifting heating to match solar generation.
Integration with Whole-Home Automation Platforms
A standalone smart radiant thermostat is useful. A radiant system that’s a node in your home automation platform is something different.
The key question is what you want the system to do that a standalone thermostat can’t. Common integration scenarios include:
Presence-based heating. When your phone leaves the geofence, your home automation system drops all radiant zones to setback temperatures. When you’re 10 minutes away (via geofence or explicit notification), it brings the occupied zones back up. Lutron’s RadioRA 3 can trigger radiant zone setpoints through compatible thermostats. Control4 and Savant can do this natively with any thermostat that has an API or Z-Wave connectivity.
Wake/sleep routines. A “Good Morning” scene starts warming the bathroom and kitchen floors 30 minutes before the alarm. A “Good Night” scene drops the bedroom to a sleeping temperature (most people sleep better at 65 to 68 degrees) while maintaining the bathroom floor at a comfortable level for a 6 AM wake-up. Crestron Home and Control4 handle this through scheduled events that push temperature setpoints to integrated thermostats.
Vacation and away modes. When a whole-home away mode is triggered by the alarm system (or by a departure keypad button, or by an occupancy sensor network that confirms the house has been empty for 4 hours), all radiant zones drop to frost protection temperatures (typically 45 to 50 degrees). The Nuheat and Warmup thermostats have this built into their apps, but a whole-home platform does it across every thermostat simultaneously with a single trigger.
Weather-predictive control. More advanced platforms are starting to use weather API data to pre-position heating schedules. If tomorrow morning is forecast to be 18 degrees instead of the usual 35, the system starts the slab earlier than usual because it knows the thermal demand will be higher. This is available in systems like Ecobee’s Smart Home and Away feature and in some higher-end whole-home platforms through custom programming.
Retrofit vs New Construction: What Changes
New construction is the ideal time to install hydronic radiant. The PEX goes into the slab (or between the joists in a wood-frame floor) before any finish work happens. You can spec a boiler sized correctly for the load, design zones around real room usage, and integrate the control system before drywall is up.
Retrofit is harder but not impossible. For slab homes, it almost never makes sense to tear out a finished floor to embed PEX: the cost and disruption rarely pencil out. The exception is a full renovation where the floor is already coming up. For wood-frame homes, a “staple-up” installation under the subfloor is feasible and common. Insulation under the PEX (R-11 or better) is essential to direct the heat upward rather than into the crawlspace or basement. Expect 20 to 30 percent less effective output compared to an above-slab installation, which affects zone sizing.
For electric radiant in a retrofit, the calculus is better. If tile work is happening anyway (a bathroom remodel, a new kitchen backsplash, a laundry room regrout), adding a Nuheat or Warmup heating mat under the new tile adds $300 to $800 to the project and a relatively simple circuit. The heating mat itself is thin (typically 1/8 inch) and doesn’t affect finish floor height meaningfully. A GFCI-protected circuit from the panel (typically 15A for small bathrooms, 20A for larger areas) is the main electrical requirement.
Making the Investment Worthwhile
Smart radiant floor heating is a meaningful investment. Doing it right means matching the technology to the application (hydronic for whole-home primary heat, electric for targeted room comfort), designing zones around actual occupancy rather than floor plan convenience, and choosing controls that fit how much integration you actually want.
For a home that’s being fully automated, radiant heat is one of the most satisfying systems to integrate because it responds to presence and schedule in ways you can feel immediately. For a home that’s just getting one smart upgrade, a Wi-Fi thermostat on an existing electric radiant mat in a bathroom is a $200 project that pays back in comfort and a few dollars per month in wasted heating. The scale is different but the principle is the same: knowing where heat is needed and when, and delivering it only then, is what turns a luxury system into a practical one.
The right integrator can spec the full picture: boiler sizing, zone counts, thermostat platforms, and how everything connects to your broader home automation system. If you’re getting quotes, ask specifically about outdoor reset control, occupancy-based setback, and which automation platforms the thermostats they use can integrate with natively. Those answers will tell you a lot about whether you’re talking to someone who installs radiant heat or someone who designs smart radiant systems.