Structured Wiring: The Backbone of Every Smart Home
Most smart home problems that show up two or three years after move-in trace back to decisions made during rough-in. Dropped video calls, Sonos zones that buffer, Ring cameras with unreliable feeds, thermostats that take eight seconds to respond, a Control4 system that works flawlessly in the demo room but hiccups in actual use: these are not software problems. They are infrastructure problems. And the infrastructure that determines whether all of this works is structured wiring.
Structured wiring is the cabling plant behind your walls. It is the physical foundation that every wireless device, every streaming service, every automation platform depends on. You cannot fix bad infrastructure with a firmware update. You cannot compensate for 1990s-grade wiring with a better router. Getting this right during construction or a major renovation is an order of magnitude cheaper than retrofitting it after drywall is closed. This article explains what structured wiring actually consists of, what to specify, where to spend money versus where you can be practical, and what questions to ask a builder or integrator before anyone touches your framing.
What “Structured Wiring” Actually Means
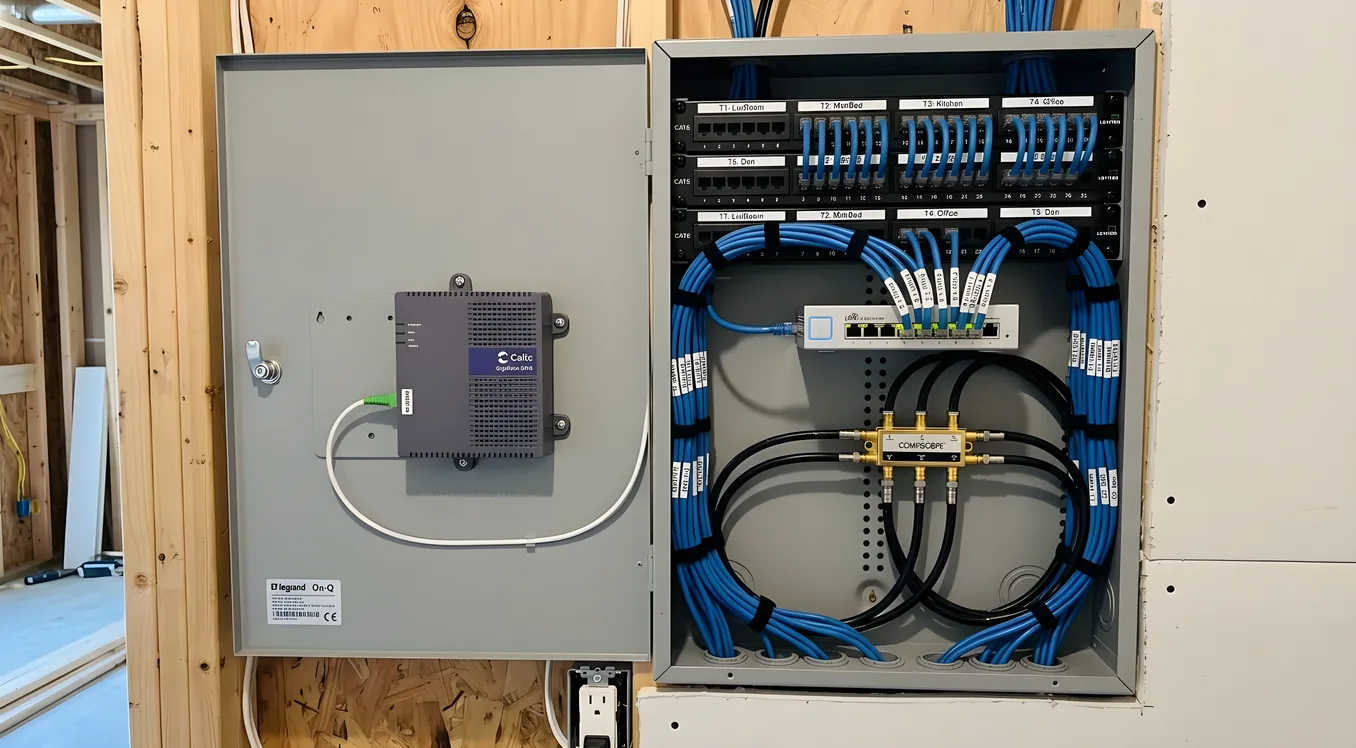
The term sounds more formal than it is. Structured wiring simply means a planned, organized cabling system that runs from a central distribution point, usually called a structured media center or network closet, to every room and device location in the house. Instead of daisy-chaining cable from room to room, every run goes home to a single panel. Star topology is the architecture. Every endpoint connects directly to the center.
The practical benefit is control. When all your cable terminates in one place, you can patch, reconfigure, troubleshoot, and upgrade without crawling under floors or cutting into walls. A coaxial run that carries cable TV today can be patched to a different device tomorrow. A CAT6A run that supports a wired workstation can be reassigned to a PoE access point when you rearrange the office. Without a central termination point, every change becomes a project.
The structured media center itself is typically a panel mounted in a utility closet, basement, or dedicated network room. Entry-level panels like the Leviton 47605-28W or the OnQ 364711-01 are rated for 28-inch to 44-inch panels and can house coaxial splitters, CAT6 patch panels, a small network switch, and your ISP’s modem in one organized enclosure. For homes above 4,000 square feet or those with significant AV and automation requirements, a full network rack and closet design becomes a better approach, with wall-mounted or freestanding 19-inch racks that accommodate enterprise-grade gear.
The Cable Types That Matter and Why
There are three categories of cable that go into a modern structured wiring installation: twisted pair (Ethernet), coaxial, and speaker/control wire. Each serves different purposes. Understanding what each does and what spec matters prevents both over-building (running fiber to a bathroom) and under-building (running CAT5e to a home theater position in 2026).
Twisted Pair: CAT5e, CAT6, or CAT6A
The choice between CAT5e, CAT6, and CAT6A is less about speed than about headroom. CAT5e supports 1 Gbps at up to 100 meters and costs around $0.08 to $0.12 per foot for bare cable. CAT6 supports 10 Gbps at 37 meters (and 1 Gbps to 100 meters) and costs $0.12 to $0.18 per foot. CAT6A supports 10 Gbps across the full 100-meter run, handles Power over Ethernet budgets more cleanly, and runs $0.20 to $0.35 per foot.
For a home being built or significantly renovated today, CAT6A is the defensible choice for all primary runs. You will spend roughly $400 to $800 more on cable across a 3,000 square foot home compared to CAT6, and you will not be wondering in 2030 whether your cabling can support whatever the next generation of access points or cameras requires. The labor cost is identical. The incremental material cost is minor relative to the total project.
Where CAT5e still makes sense: secondary locations that serve single low-bandwidth devices, like a wall-mounted thermostat or a simple IP phone. An ecobee Smart Thermostat Premium or a Nest Learning Thermostat does not need 10 Gbps to the wall. A CAT5e run to every thermostat location is fine.
Run a minimum of two CAT6A cables to every location that might support a workstation, TV, access point, or network device. One is rarely enough. Media rooms, home offices, and potential access point locations should get three or four runs. Wire costs under $1 per foot. Running another cable during rough-in costs almost nothing. Running it after drywall costs $300 to $800 per run in labor depending on your construction type.
Coaxial: RG6 Quad Shield
Coaxial cable carries cable TV, satellite signals, and antenna feeds, but it also serves as infrastructure for MoCA 2.5 networking (which can hit 2.5 Gbps on existing coax runs) and for certain whole-home AV distribution systems. The correct spec for new installations is RG6 quad shield, not RG59. RG59 is thinner, has less shielding, and is unsuitable for anything beyond short runs to a single TV. RG6 quad shield costs $0.15 to $0.25 per foot and handles up to 3 GHz, which covers satellite and distribution system requirements.
Even in homes where cord-cutting has eliminated cable TV, running coaxial to TV locations gives you flexibility. If you ever want to distribute a single antenna signal to every TV in the house, if a future AV distribution system uses coax as its backbone, or if MoCA ever becomes useful for a hard-to-reach network node, the coax run is already there.
Speaker and Control Wire
For distributed audio using a system like Sonos Amp, Nuvo, or a Control4 or Savant multiroom audio setup, in-wall speaker wire should be CL2- or CL3-rated (for in-wall use, per NEC code) and at minimum 16 AWG for runs under 50 feet. For runs 50 to 100 feet, use 14 AWG. Most serious integrators specify 14 AWG CL3 for all speaker runs as a default. At $0.20 to $0.35 per foot for 14 AWG CL3 wire, the upgrade cost over 16 AWG on a whole-home audio installation is minimal.
Control4 and Crestron installations often require dedicated low-voltage control wire for keypads, dimmers, and in-wall touch panels. Check with your integrator before rough-in about which devices in your specified system require dedicated wiring beyond the standard Ethernet home run. Lutron RadioRA 3 and Caséta systems are fully wireless, but Lutron Homeworks QSX (which powers most high-end Savant and Control4 lighting installations) uses a hybrid approach where wired runs to fixtures improve reliability in large homes.
How Many Drops, and Where
The most common structured wiring mistake is under-running locations because the homeowner was thinking about what they need today rather than what the house will need over its lifetime.
A practical baseline for a 2,500 to 4,000 square foot home:
Bedrooms (each): Two CAT6A runs to the primary desk or nightstand wall, one CAT6A to a ceiling location for a wireless access point, one coaxial to the TV wall.
Living Room and Great Room: Four CAT6A runs to the primary AV wall (receiver, streaming device, gaming console, and a spare), one or two additional CAT6A runs to opposite walls or islands, one coaxial to the TV wall, two CAT6A ceiling drops for access points.
Home Office: Four CAT6A runs minimum. Work-from-home setups accumulate devices quickly: desktop, NAS, VoIP phone, video conferencing system, secondary monitor with USB hub. One ceiling drop for a dedicated access point.
Kitchen: Two CAT6A runs to a countertop or island location (smart displays, tablets), one to a cabinet location for a smart hub if your integrator uses wired controllers.
Home Theater (if dedicated): This location deserves special attention. Run four to six CAT6A drops to the equipment rack location, one or two coaxial runs, and pre-wire for a dedicated access point. If you’re installing a Crestron or Control4 rack, coordinate with your integrator for exact run requirements before rough-in. Audio-wise, run 14 AWG CL3 to each speaker position: left, center, right, two surrounds, two heights (for Dolby Atmos), and a subwoofer location.
Exterior: Every exterior camera position (Ring, Raven, Axis, Avigilon) should have a CAT6A run. Power over Ethernet cameras eliminate the need for a separate power outlet at each location, but they require the Ethernet run. Plan for cameras at each corner of the house, above the garage, at the front door, and at any secondary entries. Budget for one or two additional outdoor access point locations if your property is larger than a quarter acre.
Utility Room / Network Closet: Every run terminates here. This room needs a 20-amp dedicated circuit (or two), adequate ventilation for heat-generating network gear, and enough wall or rack space for your structured media center or network rack. A closet that is 24 inches deep by 36 inches wide can accommodate a Leviton panel, a 1U patch panel, an 8-port managed switch, and your ISP equipment. A dedicated network room of 4x6 feet gives you room for a proper 19-inch rack, a wall-mount bracket for a UPS, and real cable management. The room design significantly affects long-term usability, which is why network rack and closet design for residential systems is worth reading before finalizing your floorplan.
Termination and Panel Standards
Cable is only as good as its termination. This is where a lot of DIY structured wiring installations lose what they gained on cable quality. A CAT6A cable terminated incorrectly at the keystone or patch panel will not support 10 Gbps regardless of how well the cable itself was run.
Every run should terminate at both ends with proper keystones or a patch panel, not just a field-terminated plug. Field-terminated plugs (the kind you crimp yourself) degrade over time and are more prone to installation error than keystone jacks. Keystones snap into wall plates and patch panels and maintain the cable’s twist ratio closer to the termination point, which is what preserves high-frequency performance.
For CAT6A specifically, use CAT6A-rated keystones and patch panels. Plugging a CAT6A cable into a CAT6 keystone drops your maximum spec to CAT6. Leviton, Panduit, and Belden all make quality residential-grade CAT6A termination products. Expect to pay $8 to $15 per keystone and $80 to $150 for a 24-port patch panel. This is not where to save money.
Coaxial runs should terminate at F-connectors, compressed or crimp type. Avoid push-on connectors in a permanent installation. A coaxial distribution amplifier at the panel can compensate for signal loss across a split if you’re distributing antenna or cable TV to multiple TVs. Look at a 2-way, 4-way, or 8-way amplifier based on the number of coaxial runs you’re feeding, sized to compensate for insertion loss at the frequencies you need.
What to Expect to Pay
Structured wiring costs for new construction typically run $3,000 to $8,000 for a 2,500 to 4,000 square foot home when installed by a licensed low-voltage contractor during rough-in. This range covers material and labor for cable installation, termination, panel hardware, and basic labeling. It does not cover the network gear that goes into the panel (switches, routers, access points) or the AV equipment at endpoints.
Retrofit costs are significantly higher. When walls are closed, every run requires fishing cable through insulation, drilling through plates, and patching walls at the entry and exit points. A single Ethernet run retrofit in a two-story home commonly runs $300 to $800 depending on route complexity. If you need 20 additional runs after move-in, the math illustrates why doing it during construction matters.
High-end integrators working on Crestron, Savant, or custom Control4 installations may charge $15,000 to $40,000 or more for structured wiring as part of a full-house integration project. This includes dedicated home-run cabling for every lighting circuit (in Homeworks QSX installations), fiber backbone between floors, and a fully designed and documented cabling plant with every run labeled, tested, and certified. That level of infrastructure is appropriate for 6,000+ square foot custom homes where the automation investment justifies it.
Wired Ethernet Versus Wireless: Where Each Belongs
Wireless coverage has improved dramatically over the past five years. Wi-Fi 6 (802.11ax) and Wi-Fi 7 (802.11be) access points can sustain multi-gigabit throughput and handle dozens of simultaneous device connections. But wireless is not a replacement for wired infrastructure. It is a complement to it.
The devices that should always be wired: your primary desktop computers, your NAS or server, your main TV and AV receivers, your network switches and access points themselves. An access point running on wireless backhaul (as in a mesh system) is limited by that backhaul connection. An access point wired directly to your network switch via CAT6A can deliver its full rated throughput to every wireless client it serves.
The practical implication: every ceiling access point location needs a wired CAT6A home run to the network closet. Enterprise WiFi for smart homes works through why consumer mesh systems hit performance ceilings that wired-backhaul access point systems do not, and this is a meaningful distinction when you have 60 or 80 devices on a modern smart home network.
Power over Ethernet (PoE) simplifies the access point and camera installation significantly. A PoE switch in your network closet can power every access point and security camera in the house over the same CAT6A run that carries data. No electrician needed at each camera or AP location, no outlet required. Power over Ethernet in smart homes covers the wattage budgets and switch specifications in detail, but the short version is: a PoE+ switch (IEEE 802.3at, 30W per port) powers most Wi-Fi 6 access points and IP cameras, while PoE++ (IEEE 802.3bt, 90W per port) is required for dual-radio access points or high-power PTZ cameras.
IoT devices, the light switches, smart plugs, door sensors, and leak detectors, are generally fine on wireless. These devices are low-bandwidth and low-latency-sensitive. The more important consideration for these devices is network architecture: keeping them isolated from your primary network on a dedicated IoT VLAN. VLANs and IoT network segmentation walks through how to set that up, but it requires a managed switch and a router that supports VLAN tagging, which means specifying the right gear in your network closet from the beginning.
Building for the Long Term
The structured wiring choices you make during construction will determine what your home can support for the next 15 to 20 years. Technology changes. The wire does not.
CAT6A supports whatever comes after 2.5 GbE and 10 GbE for home networks. Fiber is already the backbone of commercial installations, and while residential fiber-to-the-room is still a niche choice, running a conduit sleeve between floors during construction costs almost nothing and allows fiber to be pulled later without opening walls. A 1-inch ENT conduit from basement to attic, with pull strings left in place, is an inexpensive hedge against future needs.
Label everything. Every run should be labeled at both ends with a location identifier (BR1-1, OFFICE-2, LR-AP-1) before the walls close. A label printer that uses Brady or Brother M series labels costs $60 to $120. A cable tester that verifies continuity, wire map, and distance for CAT6A runs costs $300 to $800 for a quality unit like the Fluke Networks MicroScanner or the Platinum Tools Net Prowler Pro. Document every run on a simple diagram that lives in the network closet. Two years from now, when you’re adding a device or troubleshooting a connection, you will be grateful for this.
Conduit is worth the investment wherever cable crosses concrete or runs through mechanical spaces. ENT (electrical nonmetallic tubing) conduit with pull strings allows future cable replacement without core-drilling or wall demolition. Even short sections of conduit through concrete block walls or across mechanical chases protect cable from damage and make future modifications possible.
The structured wiring investment is one of the few things in a smart home build where the return is almost entirely in what you avoid: the retrofit costs, the performance limitations, the reliability problems that trace to infrastructure that was never designed for how you actually use your home. Get it right during rough-in. The rest of your system, the Control4 or Savant platform, the Lutron lighting, the Sonos audio, the security cameras and access control, all of it performs better because the foundation is solid.
Making Structured Wiring Decisions That Hold Up
Before any cable is pulled, work through these questions:
What is the square footage, story count, and general room layout? This determines run lengths and whether you need a single panel or a distributed approach with inter-floor trunks.
Where is the ISP’s demarc point, and where does the network closet want to be? Keeping the panel within 10 to 15 feet of the ISP entry simplifies the ISP equipment installation and coaxial distribution.
Which automation platform will you use? Crestron, Savant, and Control4 installations have specific wiring requirements that differ from a simpler SmartThings or Apple Home setup. Get the integration requirements in writing from your integrator before rough-in.
Will you have a dedicated home theater? If so, coordinate with your AV integrator on exact speaker positions and equipment rack locations before any wire is pulled. Moving a speaker position after wire is installed is expensive.
How many people work from home, and how many video conferencing sessions might run simultaneously? A household with four remote workers has very different uplink requirements than a household where only one person occasionally video calls. Size your infrastructure to the realistic peak scenario.
What outdoor spaces need coverage? Pool decks, covered patios, detached garages, and outbuildings all present opportunities to extend network coverage and automation reach, but they require either outdoor-rated Ethernet runs or properly weatherproofed conduit.
The answers to these questions shape a cable schedule that a low-voltage contractor or integrator can price and execute. Structured wiring is not a glamorous line item in a smart home budget. It does not get shown off to guests the way a Lutron system or a Sonos installation does. But every part of that visible system depends on it.
The homes that integrate cleanly, update reliably, and stay stable as device counts grow are the ones where someone made thoughtful infrastructure decisions before the framing was finished. The homes that frustrate their owners are the ones where the infrastructure was treated as an afterthought. That’s the entire argument for doing this right.