VLANs and IoT Network Segmentation: Securing Smart Devices
Your smart home network is doing something that would make any corporate IT director uncomfortable: running security cameras, door locks, thermostats, and laptops all on the same flat network, where every device can theoretically talk to every other device. That arrangement works fine until one of those devices is compromised, and then it becomes a problem with a very large blast radius.
IoT network segmentation is the practice of isolating smart devices onto their own network segments so that a compromised thermostat cannot reach your NAS drive, and a hacked camera cannot probe your kids’ school tablets. It’s one of the most important and most frequently skipped steps in building a smart home that’s actually secure. This article explains how it works, what hardware you need, what it costs, and how to think about which devices belong where.
Why a Flat Network Is a Security Liability
Most home networks are flat. Everything connects to the same router, gets an address in the same 192.168.1.x range, and can initiate connections to everything else. That simplicity is fine when every device on the network is trustworthy. It becomes a problem when you start adding IoT devices.
The issue isn’t that your Nest thermostat is trying to hack your laptop. It’s that IoT devices are frequently built with security as an afterthought. Manufacturers ship firmware with known vulnerabilities, stop issuing updates after 18 to 24 months, and sometimes include hardcoded credentials or telnet backdoors that are never publicized. A 2020 study by Forescout found that the most vulnerable device categories in homes were IP cameras, VoIP phones, and NAS devices, all common in smart homes. The problem has not improved meaningfully since.
When one of those devices is compromised, the attacker inherits that device’s network position. On a flat network, that means they can scan and probe every other device on the segment. They can attempt to connect to your NAS. They can intercept traffic from your laptops. They can pivot to devices that have access to your email, bank accounts, or VPN. Network segmentation doesn’t prevent the initial compromise. It contains the damage.
The practical motivation is also privacy, not just security. Many IoT devices send data to manufacturer cloud services even when you’d rather they didn’t. A Ring camera on an isolated VLAN can still reach Ring’s servers, but it cannot reach your local printer, your home server, or the Raspberry Pi running your home automation controller. You get the function without giving the device access to your entire network.
What a VLAN Actually Is
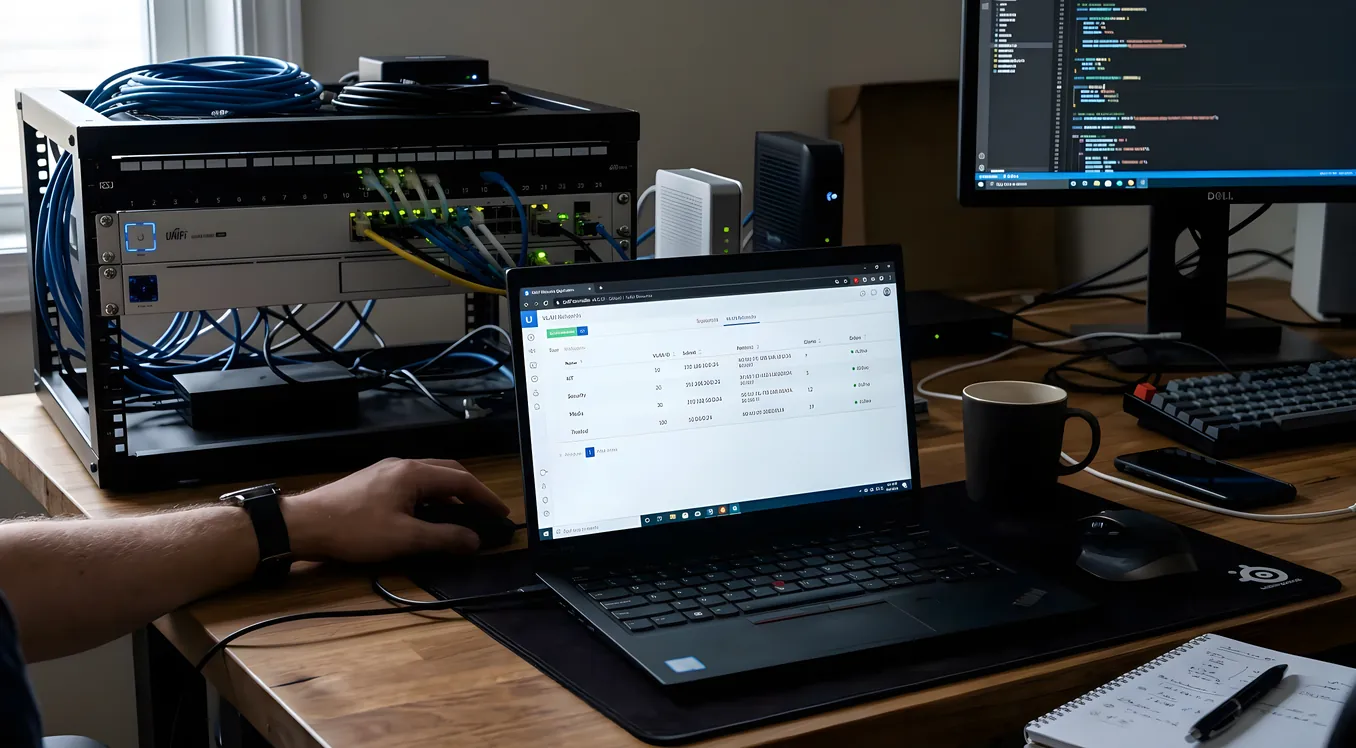
A VLAN (Virtual Local Area Network) is a way to create multiple logically separate networks on the same physical infrastructure. Instead of running separate cables and separate switches for each network segment, VLANs use tagging in the network packets to keep traffic separated at the data layer.
From a practical standpoint, you create a VLAN with an ID number (say, VLAN 20 for IoT devices). Your managed switch and wireless access points recognize that VLAN tag and treat traffic from VLAN 20 as completely separate from traffic on VLAN 1 (your main network). Your router handles the boundary between VLANs, and you use firewall rules to control what traffic can cross that boundary.
The key distinction is between managed and unmanaged switches. An unmanaged switch doesn’t understand VLANs at all. Everything connected to it is on the same network. A managed switch understands VLAN tags and can enforce the separation. This is the hardware requirement that trips most people up, and we’ll cover it in detail below.
The Hardware You Actually Need
IoT network segmentation requires three things your average consumer router setup probably doesn’t have: a router that supports VLANs and firewall rules, a managed switch for wired devices, and wireless access points that can broadcast multiple SSIDs mapped to different VLANs.
Router: Consumer routers like those from ASUS or TP-Link’s home line either don’t support VLANs at all, or implement them in limited ways that don’t give you full firewall control between segments. For a proper segmented setup, you want a router running a real firewall OS. The most common options in 2026 are pfSense (open-source, free software, runs on dedicated hardware starting around $200 for a Protectli Vault FW4B or similar), OPNsense (same category), or Ubiquiti’s UniFi Dream Machine Pro ($500 retail), which bundles the router, firewall, and controller software.
Managed Switch: For wired IoT devices (IP cameras, PoE-powered access points, hardwired smart panels), you need a managed switch that understands 802.1Q VLAN tagging. Ubiquiti’s UniFi switches are the most commonly integrated option in the residential market. The UniFi USW-8-60W runs around $109 and handles 8 ports with PoE. For larger installations with more cameras and wired endpoints, the USW-24-PoE ($299) or USW-48-PoE ($499) are the typical choices. Cisco’s SG series and Netgear’s Insight managed line are alternatives if you’re working with a different ecosystem.
Wireless Access Points: Your wireless AP needs to support multiple SSIDs, each mapped to a different VLAN. Consumer mesh systems like Eero, Google Nest WiFi, or even the higher-end Orbi units are largely incompatible with proper VLAN setups because they don’t expose the configuration needed. Enterprise-grade access points like Ubiquiti’s UniFi APs, Meraki, or Aruba Instant are what give you the flexibility to broadcast “Main Network,” “IoT Devices,” and “Guest” as separate wireless networks, each tagged to a different VLAN. Ubiquiti’s UniFi AP U6 Lite runs around $99 and handles up to four SSIDs, each with independent VLAN assignments.
Total hardware cost for a typical single-family home setup: $400 to $900, depending on scale. A starter config with a pfSense box, an 8-port managed switch, and two UniFi APs lands around $450 to $500 in hardware. That’s not free, but for a home with $50,000 in smart home equipment and personal data on the network, it’s reasonable insurance.
How to Structure Your Network Segments
The most useful segmentation model for most homes is three segments: a main trusted network, an IoT segment, and a guest network. Some installations add a fourth segment for security cameras specifically, given that camera footage is sensitive and cameras are among the most targeted devices on home networks.
Main VLAN (VLAN 1 or 10): Laptops, phones, tablets, NAS drives, home servers, smart TV streaming boxes you actually trust. Devices here can initiate connections to IoT devices if needed (to reach your Sonos speakers, for example), but IoT devices cannot initiate connections back.
IoT VLAN (VLAN 20): Everything else: thermostats, smart plugs, Lutron Caseta bridges, Ring base stations, Nest doorbell cameras, ecobee sensors, Philips Hue bridges, smart switches. These devices need internet access but have no business reaching your laptops or NAS. The firewall rule here is simple: allow established/related connections (so your laptop can reach the device when you initiate the connection), block everything IoT-initiated toward the main VLAN, and allow internet access.
Guest VLAN (VLAN 30): Internet-only access, isolated from both main and IoT segments. Guests get no visibility into anything on your network.
Camera VLAN (VLAN 40, optional): If you run IP cameras through a local NVR (Network Video Recorder) rather than cloud-based systems, isolating cameras onto their own segment adds a meaningful layer. Cameras can reach the NVR on the same VLAN, but they have no internet access and no path to other devices. This prevents a compromised camera from phoning home to an attacker’s server. The NVR itself gets an additional rule allowing access from your main VLAN so you can view footage.
The camera isolation approach is particularly valuable if you’re running a prosumer or professional IP camera system. Reolink, Amcrest, and Hikvision cameras all have histories of firmware vulnerabilities. Axis and Hanwha cameras have better security track records but still benefit from isolation. For an in-depth look at how PoE powers the camera infrastructure, the wiring and switch configuration are closely related to this VLAN setup.
Firewall Rules That Actually Matter
Setting up VLANs without configuring firewall rules between them is like building rooms in your house and leaving all the doors open. The VLAN tagging separates traffic at layer 2, but without inter-VLAN firewall rules, your router may route freely between segments.
The rules you actually need, in order of importance:
Block IoT to Main (the essential rule): Any traffic originating from the IoT VLAN destined for the main VLAN should be blocked. This is the core of segmentation. Write it as a deny rule at the top of your inter-VLAN policy.
Allow established/related return traffic: When your laptop initiates a connection to your Sonos system on the IoT VLAN, you want the return traffic to reach your laptop. Most firewalls handle this automatically with stateful inspection if you allow the initial connection from main to IoT. Confirm this is working, because if it’s not set correctly you’ll lose control of IoT devices from your main network.
Allow main VLAN to initiate to IoT VLAN: This lets your control apps, home automation hubs, and voice assistants reach smart devices. Direction matters: main initiating to IoT is fine, IoT initiating to main is blocked.
Allow IoT VLAN internet access: Smart devices need to reach their manufacturer cloud services. Allow outbound internet access from the IoT VLAN. Some installations go further and restrict IoT devices to specific destination ports (80, 443, 123 for NTP) to reduce the attack surface.
Block IoT to IoT if needed: By default, devices on the same VLAN can talk to each other freely. If you want to prevent one IoT device from probing another (useful for rental or mixed-use properties), some routers support “client isolation” within a VLAN, which blocks device-to-device traffic on the same segment.
Practical Complications (What Actually Goes Wrong)
mDNS and local discovery: Sonos, Chromecast, AirPlay, and many other devices use mDNS (multicast DNS) for local discovery. mDNS doesn’t cross VLAN boundaries by default. If you put Sonos speakers on the IoT VLAN and try to control them from the main VLAN, the Sonos app may not find the speakers.
The fix is mDNS repeating, also called mDNS reflection. pfSense and OPNsense both support Avahi, a daemon that can forward mDNS between VLANs. Ubiquiti’s UniFi ecosystem has a built-in mDNS repeater toggle in the controller. Enable it, specify which VLANs should share mDNS announcements, and local discovery works across the segment boundary. This is the single most common troubleshooting issue in VLAN setups for smart homes.
Platform controllers that need local network access: Some platforms require their hub or controller to communicate directly with devices on the same network. Control4 controllers, Lutron RadioRA 3 processors, Crestron control processors, and Savant hosts are examples. If your controller is on the main VLAN and devices are on the IoT VLAN, you may need specific firewall rules to allow the controller to reach devices. Professional integrators deploying Control4 or Crestron typically put the controller itself on a separate management VLAN or on the IoT VLAN alongside the devices it controls.
Streaming and voice assistants: Amazon Echo, Google Home, and Apple HomePod are an interesting edge case. They’re IoT devices in the sense that they’re always-on microphones with cloud connectivity. But they’re also your primary interface to controlling other IoT devices. Some installations put them on the IoT VLAN alongside other devices. Others put them on the main VLAN because household members use them constantly and the mDNS complexity of cross-VLAN voice control isn’t worth it. There’s no universally right answer; it depends on your threat model.
Returning devices to defaults: If a smart device is factory-reset, it loses its VLAN assignment at the access point level. You’ll get a reconnection attempt on whichever SSID the user connects to, which may be the main network. Build a habit of reconnecting reset devices to the IoT SSID explicitly.
Where This Fits in a Structured Network Design
IoT network segmentation doesn’t exist in isolation. It’s one layer in a broader approach to home network design that starts with physical infrastructure and works up through switching, routing, and wireless.
The physical layer matters more than most homeowners realize. If your network closet is running consumer-grade equipment on a single unmanaged switch, adding VLANs requires replacing that switch with a managed one and potentially re-running patch cables to maintain clean segment organization. Structured wiring that runs dedicated home-run cables to a central termination point makes this significantly simpler because you can reassign ports at the patch panel without crawling around in the walls. Similarly, a properly designed network rack or closet gives you the physical organization to expand your managed switching and routing hardware as the smart home grows.
On the wireless side, the distinction between mesh systems and enterprise access points is directly relevant here. Most mesh systems can’t handle the VLAN configuration this type of segmentation requires. If you’re planning a segmented network, that’s a strong reason to build around access points that support multi-SSID VLAN tagging rather than a mesh system that makes segmentation difficult or impossible.
When to Hire Someone Versus DIY
IoT network segmentation is achievable as a DIY project if you’re comfortable with networking concepts, reading documentation, and troubleshooting connectivity issues methodically. pfSense and OPNsense have large communities and extensive documentation. Ubiquiti’s UniFi ecosystem is more consumer-friendly and has a well-maintained help center. Expect to spend 4 to 8 hours on a first-time setup for a typical home, plus additional time troubleshooting mDNS and cross-VLAN connectivity.
The case for professional help is stronger when you have a large number of devices (30+), a high-end automation platform like Control4 or Savant, or when the troubleshooting complexity exceeds your tolerance. A professional integrator will set up segmentation as part of a broader network design engagement, typically running $500 to $2,000 for network design and configuration labor depending on scope, on top of hardware. For homes where the smart home investment runs into the tens of thousands of dollars, that’s a reasonable cost to ensure the network foundation is solid.
Building a Network That Grows With You
A well-segmented network is not a one-time project. As you add devices, you’ll need to make conscious decisions about which VLAN each one belongs on. Building that habit is part of the security benefit. Every new device triggers the question: does this belong on my trusted network, or should it be isolated?
The answer is almost always: isolate it. The default position for any new IoT device should be the IoT VLAN until there’s a specific reason it needs main network access. If the app works, the integrations work, and the device functions normally on the isolated segment, leave it there. If something breaks, investigate the specific connectivity requirement and write the narrowest possible firewall rule to address it.
That incremental approach, adding devices thoughtfully and restricting them by default, is how a flat network becomes a properly segmented one over time. It’s also how you build a smart home that’s genuinely secure rather than one that looks secure until a single compromised budget camera undoes all of it.
The networking hub on this site covers the full stack: infrastructure, switching, wireless, and device management. If you’re starting from scratch on a smart home network design, the structured wiring and network rack planning articles are the right place to begin before segmentation even enters the picture.